Friday 16 November 2012

RUN ANDROID 4.0.4 ICE CREAM SANDWICH ON YOUR PC WITH INTERNET AND ANDROID MARKET


HELLO DO YOU WANT TO RUN ANDROID 4.0 ICS ON YOUR PC OR MAY BE YOU HAVE TRIED BEFORE BUT WITHOUT INTERNET.

I HAVE GOT A SOLUTION TO THIS. ALL YOU GOTTA DO IS TO DOWNLOAD THIS ANDROID PATCH OR BUILDROID FOR VIRTUALBOX AND YOU ARE DONE.

1. DOWNLOAD THE BUILDROID FROM HERE BUILDROID V4.0.4 (1024 X 600) OR FOR MORE VERSIONS YOU CAN GO TO THIS WEBSITE (CLICK HERE).

2. START VIRTUALBOX AND THEN SELECT FILE AND THEN CLICK IMPORT APPLIANCE.

3. THEN CLICK ON CHOOSE BUTTON AND THEN BROWSE FOR THE DOWNLOADED FILE AND SELECT IT AND THEN CLICK NEXT AND THEN CLICK IMPORT.

4. AFTER THAT RUN ANDROID AND THEN TRY RUNNING THE BROWSER.

5. AFTER THAT AN IMPORTANT THING THAT YOU ARE GONNA NEED IS THE ANDROID MARKET SO FOR THAT OPEN THE TWO LINKS GIVEN AT THE BOTTOM IN THE WEB BROWSER IN YOUR ANDROID RUNNING IN VIRTUALBOX AND THEN DOWNLOAD THE TWO .apk FILES AND INSTALL THEM.

Google.Play.Store.apk
Google.Services.Framework.apk


WATCH THE VIDEO OUT HERE IF YOU ARE NOT CLEAR!!

THATS ALL.......


THNX AND PL COMMENT


Thursday 15 November 2012

[ROOT]ROOT BLUESTACKS BETA-1 0.7.2.751

HEY GUYZ,HERE IS A VERY EASY WAY TO ROOT BLUESTACKS BETA -1 ON, BUT THE ONLY DISADVANTAGE IS THAT IT WORKS FOR ONLY VERSION 0.7.2.751.....

I HAVE TESTED THIS METHOD OF ROOTING AND IT WORKS PERFECTLY FOR ME AND WOULD LIKE TO SHARE IT WITH ALL OF YOU.


THINGS THAT YOU ARE GONNA NEED


1. FILE SPLITTER/JOINER SOFTWARE- DOWNLOAD IT FROM HERE AND INSTALL IT.


2. THREE ROOT FILES THAT YOU HAVE TO JOIN LATER USING THE ABOVE SOFTWARE.DOWNLOAD THESE THREE. Remember that all the below three files should be in one folder.


ROOT.002


The password for the above files is : erbil. 


METHOD OF ROOTING

1. Open File Splitter/Joiner Software and select the tab "JOINING" and click on the adjacent button showing "1".

2. Here you need to select the file Root.0.7.2.751.001 i.e. the first file you have downloaded and then click on join button and wait for it to complete.

3. After the completion of the above process, you will find a new Root.0.7.2.751.7z file in the same directory as the part files.

4. Open this and extract the Root.fs and README.txt file.

5. Stop all the BlueStacks processes form the TASK MANAGER

6. Copy the ROOT.FS file to (Windows 7) C:\ProgramData\BlueStacks\Android. OR in (Windows XP) and C:\Documents and Settings\All Users\Application Data\BlueStacks\Android replcing the previous one AND REMEMBER TO SAVE A BACKUP COPY OF THE PREVIOUS ONE IN CASE OF ANY FAILURE LIKE NOT STARTING...

7. After this RESTART BlueStacks and you will have the root access.


WATCH THE NEW VIDEO OUT HERE IF YOU ARE NOT CLEAR


For sure check it with an app like Root Checker.

Mounting /system as Read/Write was possible in this one (Look at the screenshot below). Looking further to get it fixed on other versions too.

*********DOWNLOAD THIS VERSION OF BLUESTACKS 0.7.2.751 HERE.***********


Friday 27 July 2012

[TWEAK]INSTALL iPHONE THEME ON BLUESTACKS

iPhone Theme on BlueStacks

Do you want to change the appearance of BlueStacks to an iPhone .
Just download the iLauncher app for BlueStacks from here:- iLauncher.apk


Features of iLauncher

* SUPER SMOOTH SCROLLING, just like iPhone.
* Icons have rounded corners and gloss effects.
* Long touch icons to move them around and position them as you like.
* Dock-bar

* Easily uninstall apps from your home screen.
* Press the back button to exit edit mode.
* Can change each application's name and icon by touching the app shortly in jiggle mode.
* Spotlight Search
* Folders
* Shortcuts
* Support Tablets (iPad mode)
* Can change logo.


[TWEAK]INSTALLING ANDROID MARKET ON BLUESTACKS

Primary Way

1. You need to download this archive Google Play Store.rar.
2. After downloading the archive extract the folder "Market Install" to a simple place for eg on the Desktop.
3. Open the extracted folder "Market Install" and the Right click each file seperately and then select Open With and then BlueStacks APK Handler or if you dont see that option then click Browse and go to this directory:-
C:/Program Files (x86)/BlueStacks and then select HD-ApkHandler.exe and click OK.
4. Restart BlueStacks and you have the Android Market right in front of you....

Alternate Way


1. You need to download these tools :- OSF MOUNT and EXT2 VOLUME MANAGER and ROOT EXPLORER.apk file. DOWNLOAD THE FILES FROM HERE:-

OSF Mount (32 Bit)  OSF Mount (64 Bit) 
EXT2 Volume Manager
ROOT EXPLORER.apk

2.After downloading and installing everything first of all kill all BlueStacks processes in the task manager (starting with HD-...) and then Open EXT2 Volume Manager click on Tools in the Menu Bar and then Service Management.

3. Under Service Startup Mode select "SERVICE_DEMAND_START" and then under GLOBAL VOLUME SETTINGS uncheck "Mount all volumes in read-only mode" and check "Enable writing support for ext3 volumes".

4. Under Service Status at the top you will notice "Ext2Fsd is NOT started". So click on the tab "START" just on its right and then click the "APPLY" button. A message will appear just click OK and minimize Ext2 Volume Manager.

5. Now Run OSF Mount and click on "Mount New" and then click the dotted button under "Image file" and then  browse to this folder
"C:/ProgramData/BlueStacks/Android and select "SDCard.fs" file

6. Remember to ***UNCHECK THE READ-ONLY DRIVE*** at the bottom. and then click OK.

7. Wait for it to mount and then open My Computer. Here you will see a new drive "SDCard(H:)" or "Local Disk (H:)" something similar. Open it. Here create a folder "Android" and copy the contents of the extracted archive in the main part and paste them into the newly created folder


8. After copying all the files Open OSF Mount again and click "Dismount all and Exit" and then click OK and wait for it to dismount devices and exit.

9. And then Restart BlueStacks.


10. In BlueStacks open Root Explorer and scroll down to "sdcard" folder and open Android folder and Install the three apps.


Visit this link to see the video of How To Install Android Market on BlueStacks Beta-1


[TWEAK]COPY ANY FILE TO SDCARD OF BLUESTACKS

1. You need to download these tools :- OSF MOUNT and EXT2 VOLUME MANAGER and ROOT EXPLORER.apk file. DOWNLOAD THE FILES FROM HERE:-

OSF Mount (32 Bit)  OSF Mount (64 Bit) 
EXT2 Volume Manager
ROOT EXPLORER.apk

2.After downloading and installing everything first of all kill all BlueStacks processes in the task manager (starting with HD-...) and then Open EXT2 Volume Manager click on Tools in the Menu Bar and then Service Management.

3. Under Service Startup Mode select "SERVICE_DEMAND_START" and then under GLOBAL VOLUME SETTINGS uncheck "Mount all volumes in read-only mode" and check "Enable writing support for ext3 volumes".

4. Under Service Status at the top you will notice "Ext2Fsd is NOT started". So click on the tab "START" just on its right and then click the "APPLY" button. A message will appear just click OK and minimize Ext2 Volume Manager.

5. Now Run OSF Mount and click on "Mount New" and then click the dotted button under "Image file" and then  browse to this folder

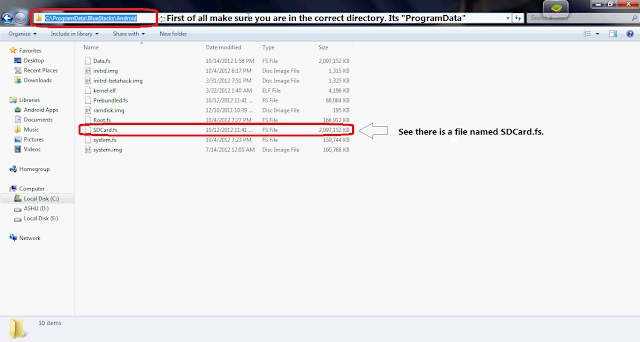
For Windows 7 == "C:\ProgramData\BlueStacks\Android"
For Windows XP == "C:\Documents and Settings\All Users\Application Data\BlueStacks\Android"

and select "SDCard.fs" file

6. Remember to ***UNCHECK THE READ-ONLY DRIVE*** at the bottom. and then click OK.

7. Wait for it to mount and then open My Computer. Here you will see a new drive "SDCard(H:)" or "Local Disk (H:)" something similar. Open it. Here you can do anything you want for eg. If you want to create a new folder like Music or My Data or you can copy any file to it like music files or video files.

8. After copying your desired files Open OSF Mount again and click "Dismount all and Exit" and then click OK and wait for it to dismount devices and exit.

9. And then Restart BlueStacks.

10. In BlueStacks open Root Explorer and scroll down to "sdcard" folder and open it and YOU WILL FIND YOUR COPIED FILE OR FOLDER THERE.


I CREATED A FOLDER MUSIC IN MY SDCARD.


IF YOU THINK THIS WAS HELPFUL THEN DON'T FORGET TO COMMENT. SEE OTHER POSTS TOO.


SEE THIS PIC IF YOU CAN'T FIND SDCARD.FS


*********DOWNLOAD BLUESTACKS VERSION 0.7.2.751 HERE....********


Hey all of you there I want to inform you that Bluestacks Co. Ltd stopped making SDcard.fs after the release of 0.7.2.751 (This version has Sdcard.fs). So you guyz need to download this version from the new LINK that I've added in the post above ...Also wanted to specify that I can't upload a 2 GB file (i.e. SDcard.fs) on Mediafire. It is not allowed. The capacity is only 500 MB..So i request you all to download the above mentioned version of Bluestacks and try to root it. Happy ROOTING :)

Thursday 26 July 2012

[TWEAK] INCREASE RAM SIZE OF YOUR BLUESTACKS

1. Click Start and then type RUN and open it.
2. In the next window type without quotes "regedit" and hit ENTER.
3. Scroll down to
HKEY_LOCAL_MACHINE>SOFTWARE>BLUESTACKS>GUESTS>ANDROID.
4. On the right hand size you will see Memory under Name column. Double click to open it.
5. Change the value to your desired one and ENJOY.....

[ROOT]ROOT BLUESTACKS BETA - 1

DOWNLOAD LIST (assuming you already have BlueStacks installed):

1. initrd-betahack.img     ***INCLUDED***
2. ramdisk.img                 ***INCLUDED***
3. system.img                 *NOT INCLUDED*
4. su.x86                           ***INCLUDED***
5. BlueRegistryMOD       ***INCLUDED***


EXTRACT BLUESTACKS_REGISTRY_MOD.zip AND Copy initrd-betahack.img, ramdisk.img, system.img into C:/ProgramData/BlueStacks/Android

Changes that need to be made to the registry are contained in BlueRegistryMOD.reg

Open BlueRegistryMOD with Notepad.
YOU MUST ENTER YOUR SPECIFIC USER ID BEFORE RUNNING BlueRegistryMOD.reg !!!
Where the registry key says ENTER-YOUR-GUID-HERE you need to enter the number (with 
dashes) found here:

FIND YOUR SPECIFIC GUID HERE!!!
[HKEY_CURRENT_USER\Software\BlueStacks]
“USER_GUID”=”SOME-NUMBERS-HERE”

Example of a GUID:
“USER_GUID”=”8dfcb602-4b7d-11e1-9dc9-f3dea6cb4293”

Example of a modified “BootParameters” with correct GUID and changes made to mount /system:
[HKEY_LOCAL_MACHINE\SOFTWARE\BlueStacks\Guests\Android]
"BootParameters"="root=/dev/sda1 SRC=/android DATA=/dev/sdc1 SDCARD=/dev/sdd1 GUID=8dfcb602-4b7d-11e1-9dc9-f3dea6cb4293 armApps=true GlMode=1 OEM=BlueStacks "
ENTER-YOUR-GUID-HERE must be changed in 2(two) places in BlueRegistryMOD.reg

THIS IS THE PROCESS:
Make sure to exit BlueStacks before proceeding
1. Paying attention to the guidelines above, place the following files in their correct location – this includes initrd-betahack.img, ramdisk.img, and system.img.
2. After finding your GUID and making the appropriate changes to BlueRegistryMOD.reg in 2(two) places, run the registry file.
3. Start/restart BlueStacks – go to the Start menu>type Start Bluestacks
4. Start adb on your computer

To start adb download the ADB zip file and extract it to your desktop. Then open the folder you have just extracted and then Hold SHIFT and then RIGHT CLICK mouse button or press APPLICATION KEY. Then click "Open Command Window Here". After that type these commands one at a time and press enter for example 

Type adb connect 127.0.0.1:5555 and then press ENTER, then the next one followed by ENTER and so on.
----------------------------------------------------------------------------------------------------------------------------------

adb connect 127.0.0.1:5555
adb root
     ***You should get message: “adbd is already running as root”***
adb remount
adb shell rm /system/xbin/su
adb push su.x86 /system/xbin/su
     ***su.x86 must be copied in the ADB folder you have downloaded and extracted above. ***
adb shell chmod 6711 /system/xbin/su
adb shell mount -o ro,remount t-ext4 /dev/sdb1 /system

----------------------------------------------------------------------------------------------------------------------------------

Exit adb by closing the command window
Restart BlueStacks – go to the Start menu>type Start BlueStacks

At this point you should have root and read/write access.
Verify root using a tool like Root Check. I suggest Root Check Pro because it will point you to what the problem is if you do NOT have root.
Verify read/write access using a tool like Root Explorer.
Enjoy.


================================================================


THANK YOU AND DO NOT HESITATE TO ASK FOR ANY PROBLEM........