DESCRIPTION:- One of the most powerful app of all time. With over 500,000 downloads this is the most awesome and creative camera app with built in some extra-ordinary features. These are what makes this app so awesome. The app also comes with a built in editing pack which allows you to edit photos in a very highly professional way. It has been reviewed as the best camera app by "lifehacker", "SlashGear" and "USA Today". So just go Grab It!
FEATURES:-
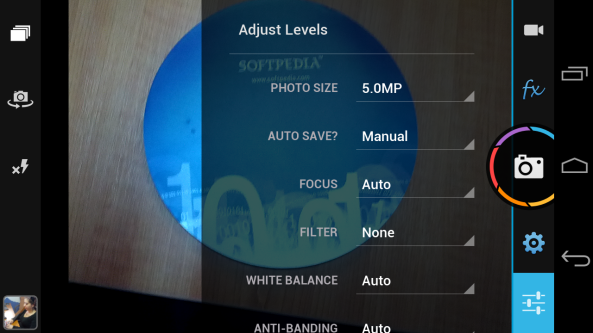
POWERFUL CAMERA:
● Optical / digital zoom (pinch to zoom up to 6x)
● Fastest camera on Android - up to 10 shots per second + instant effects
● Front facing camera (if avail)
● Customization of ALL hardware buttons
- e.g. volume buttons to control zoom, trackball to snap shot...
● Live previews of some effects, e.g. frames, buddies
● Silent camera (if device supports)
● Tweak hardware options: autofocus, whitebalance, nightshot...
● Settings for iso, focus metering, brightness, exposure, contrast, saturation, sharpness (based on device)
● 1-click upload photo to Facebook, Twitter, Flickr, etc.
● Flash (if avail)
● Customizable grid overlays
● Horizon level indicator
● NEW!! Live Wallpaper - now "Photo FX Live Wallpaper" app
MULTIPLE SHOOTING MODES:
● Stable Shot: on-screen meter to show current level of movement
● Timer
● Voice Activated: take a picture by clapping, shouting...
● Burst Mode
● Collage
● Time Lapse
IMPORT YOUR EXISTING PHOTOS:
● You can import existing photos from your phone's gallery by clicking Menu->Import.
POST PROCESSING:
● Combine effects using non-destructive editing
● Process at full camera resolution (up to 8mp if avail)
● 10 ready made presets: Diana, Retro, Holga 35mm, Toy Camera...
● 20 Color FX: vintage, lomo, cinematic, funky, pencil...
● 15 Frames: thin, rounded, lens, polaroid, filmreel...
● 6 Vignette Surrounds: heavy, invert, spotlight...
● 12 Distort FX: fisheye (like fxcamera), mosaic, twirl...
● 9 Mirror FX
● 3 Tilt-shift FX
● 3 Textures, 5 Light Leaks, 5 Bokeh FX
● Crop to any size of your choice: 3x8, square, instant, 6x4...
● Digi composites (photoshop style overlays)
● Props and famous 'buddies' in your pictures (move and resize!)
● Create stunning collages: e.g. 2x2 passport style combination shots
● Random effects
OTHER FEATURES:
● Fullscreen shutter: click anywhere on screen to shoot!
● Animated shutter effect
● Support geotag / exif tags
● Select sdcard folder to save photos (incl external sd)
● Auto save shots
● Win $100 in Instagram style photo contest
● Pro scene modes, e.g. nightshot, beach (Droid only)
● View last shot in picture gallery
● Use as default camera
● Rotate / crop photos
● Widescreen lens / capture (if device supports)
● Support from Android 1.6 through to Android 4.x (incl tablets)
● Switch to video
● ICS, JB, Holo style UI
FREE DOWNLOAD PACKS:
● Fun props
● Frames
● Famous ‘buddies’ in your pictures
● Composites (paper overlays)
● Shutter animations
● Scary Halloween ghouls and ghosts


.jpeg)


.png)